
 Tuning")
Common Rail (CR) Tuning
High Pressure Common Rail fuel systems are the key piece of technology at the heart of modern diesel engines. The advances in this area over the last 20 years have taken diesel cars from being slow, dirty and noisy to clean, torquey and powerful, with much wider rev ranges and powerbands. While Volkswagen bucked the trend for a number of years with the ubiquitous PD engines, since about 2010, VW joined the rest of the automotive industry and made the switch to Common Rail for all of its diesel vehicles.
PD engines use unit injectors. In this type of system fuel is delivered to the injectors at a relatively low pressure of around 10bar. The injector is compressed by a camshaft lobe to produce the high pressure required to deliver the fuel to the cylinder, and then the injector opens to deliver the fuel. Each injector has to generate the pressure every engine cycle. PD BLOG (Coming Soon)
In a Common Rail system, there is a High Pressure Fuel Pump (HPFP) which pumps fuel into the rail - this rail is held at the desired pressure of injection and the injector opens to deliver the fuel. All injectors work from the same rail, which is why it is known as a ‘common’ rail. In a V6 or V8 engine, there may be 1 fuel rail per bank of cylinders. By separating fuel pressurisation and injection, this means Common Rail systems have two main advantages - greater precision and control of fuel delivery, and greater injection pressure. While this tech is mostly driven by ever more stringent emissions regulations, it is also good for performance.
Here's a good video by Engineering Explained
Through the years injection pressures have been steadily increasing. Early fuel systems were rated to 1350 BAR, and the latest systems in engines developing well over 100bhp per litre use 2500 BAR of fuel rail pressure with 3000 BAR systems on the horizon. High Injection pressure is good for two reasons - reduced injection duration and increased fuel atomisation / mixing. Getting the fuel in the cylinder quickly, in as fine a mist as possible and rapidly mixing it with the available air are absolutely key factors in making power from a diesel engine, as well as reducing exhaust gas temperatures.
The general principles of tuning a Common Rail engine are similar to a PD - get more fuel and air into the engine at the right time and you’ll be making more power. There are however a few other things that need to be considered.
Because of the way PD injectors work, they can only inject fuel effectively when the cam is pumping the injector and pressurising the fuel. In a Common Rail engine, the fuel pressure is maintained at the setpoint by the HPFP, regardless of what the injectors are doing.
This is why we have chosen a Common Rail engine for our Arosa drag car. We are aiming to push these engines further than anyone else whilst learning everything we need to know so we can tune customers cars safely to double the factory figure just like the good old PD engines.
VAG CR engines use far more modern and complex ECUs than the PDs - while a lot of this complexity is due to emissions compliance, the faster processors and finer control in these ECUs generally means that the engine runs smoother, with far better protection for the hardware against overboost and excessive temperatures. From a tuning point of view, these complex ECUs can present some challenges. There is a large amount of data and physically lots of tables which must be adjusted to achieve maximum performance. The ECUs also can be tricky to read and write - with advanced tools like we have at Darkside, the vast majority of vehicles can be tuned via the OBD socket, and in the event of an ECU failure, data can often be recovered. Unlike earlier ECUs fitted to PDs, poor tuning or writing of incorrect files will almost always cause a serious ECU problem, often rendering the unit completely useless, or ‘bricked’ as it is known in the industry.
Tuning
Most of the information below relates to 2.0 Common Rail Engines. The principles remain the same for the 3.0 (and 4.0, 4.2 and 6.0 if you are a bit mental and need to tow a small building) but the power figures and upgrade points will differ.
Turbochargers
The main issue with pretty much all of the modern engines is that as standard they are already quite stretched from the factory and due to being optimised for emissions, they don't leave a lot of extra capacity for tuning without a slightly more expensive and complex upgrade path, compared to the PD engines at least. Luckily the potential upsides of these modifications are worthwhile if carried out in the correct order.
After the usual custom remap, some people are still hungry for more and that extra 30 or 40hp, however it is worth considering that a remap is the the cheapest extra power you will buy!
The next step for most engines is an upgraded Turbocharger. There are many to choose from and the same rules apply to the CR engine as to any other Diesel - Find a turbo that meets your ultimate power goal and then decide how much more you are willing to spend on further modifications, whilst factoring in the remapping costs which could be anything from £500-£1000.
We have another blog describing what turbochargers to choose. TURBO BLOG (Coming Soon)
See our Turbo options HERE
Fuel Pumps
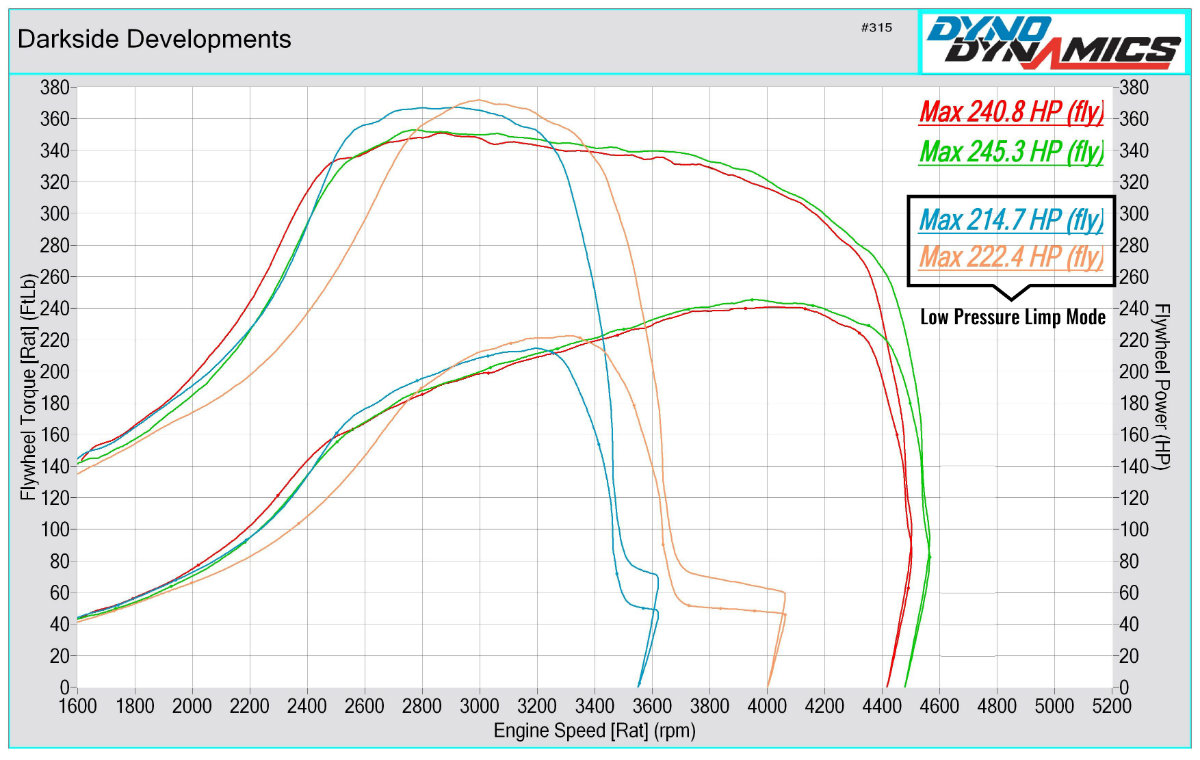
The next limiting factor for these engines after the turbo is the stock CP4 Fuel Pumps, we experience Rail Drain at around 250bhp on most 2.0 Engines, if you are happy at this power level, perfect!
If you are seeking a little more than 250bhp, increasing the injection duration will just cause Limp Mode due to Rail Drain, which is where the fuel pump is not able to deliver enough quantity of fuel. The limp mode is low rail pressure being detected by the ECU and even if you tune around this problem you won't see any more power / limp mode.
The graph below shows the Blue and Orange lines on course to make good power before draining the rail and dropping the car into limp mode. The Red and Green graph are after we have lowered the duration just enough to maintain the rail pressure.
The next step is to upgrade to a CP3 Pump. People familiar with Common Rail diesels will be asking, How can a pump from an older generation be an upgrade? The answer is fairly simple. The CP3s pumps came (at least on passenger cars) at a time when emissions were less of a concern but power, the ability to run on poorer quality fuel and longevity were more of a selling point.
The main difference between CP4 and CP3 pumps are the number of plungers that are pressuring the fuel, a CP3 pump has 3 pistons so will feed the rail with a constant pressure and is not timed to the engine rotation at all. This means a CP3 pump can be fitted to any engine regardless of cylinder count.
CP4 fuel pumps don't have 4 plungers despite the name! The CP4.1 pump is fitted to 4 cylinder engines and has only 1 plunger that is timed, roughly, within 15° of Top Dead Centre (TDC)
CP4.2 pumps have 2 plungers and are fitted to 6 or 8 cylinder engines to ensure the plunger is timed closely to the injection pulse to maintain stable rail pressure
Simply, for each revolution of the crankshaft, the smallest CP3 pumps deliver twice as much fuel to the rail compared to the largest CP4.1 and because there is now an excess of fuel flow available we can increase rail pressure to 2000 or 2200 BAR to gain 5 to 10% more power without any negative effects.
The CP3 pump we use in our upgrade kit is fitted to larger engines producing well over 300hp, so with the correct supporting mods this pump will easily deliver fuel to make around 300hp on a 2.0 Common Rail engine. We then modify those for higher output, should there be a requirement for more power than a stock pump can deliver. Tuning for a CP3 Pump on the VAG ECUs is not easy and requires time consuming trial and error.
Fitting a CP3 without any airflow mods is not really required, but in countries where fuel quality is a major issue, it is known for this upgrade to be fitted even with the standard turbo due to the CP3s reliability.
See our CP3 Pump options
HERE
Air Flow
So, now you are thinking you will fit a turbo and CP3 pump then get your car tuned and 300hp is only a dyno pull away? In an ideal world we would love this to be the case. Unfortunately efficiency of standard TDi engines is not only achieved by leaving the factory with a minimalist fuel pump. The cylinder heads and valve-train on the Common Rail engines are very restrictive for ultimate power, they may be good for low engine speeds and light load where most standard cars will spend 99% of their time, but life is boring on the motorway at 70mph so lets talk about upgrades!
The first component to mention are the super soft Valves Springs. These are by no means the worst springs in a stock diesel engine (BMW M47/57 take that crown), but going stiffer is never a bad thing when you realise the same valve springs are used in the 75hp 1.2 TDI engine! We produce a set of upgraded springs at an affordable price, and also produce a very handy tool to make installation simple without removal of the head. The design of the heads uses the same valve spring on the intake and exhaust but at a different fitted height to give an increase in seat pressure for the Exhaust side. This is due to the increased back pressure at the hot side of the engine due to the turbocharger. This is not a concern as long as you are aware and don't end up coil-binding the springs when combined overly aggressive cams...
The standard camshafts are very mild in comparison to earlier PD engines. To increase the effectiveness of the swirl port (more on that later), both intake valve openings are timed differently and the swirl port has slightly more lift. When you are looking for more power you want as much air to get into the engine as quickly as possible, then when you are done with it, spit it back out even quicker so opening one intake valve before the other is just wasting precious time. We have created a cam profile that moves the openings closer together, opens the valves for longer and as far as possible without further engine modifications.
Installation of the valve springs at the same time as camshafts is a wise choice, since the cams need to be removed to get to the springs, so we would not advise springs alone for this reason.
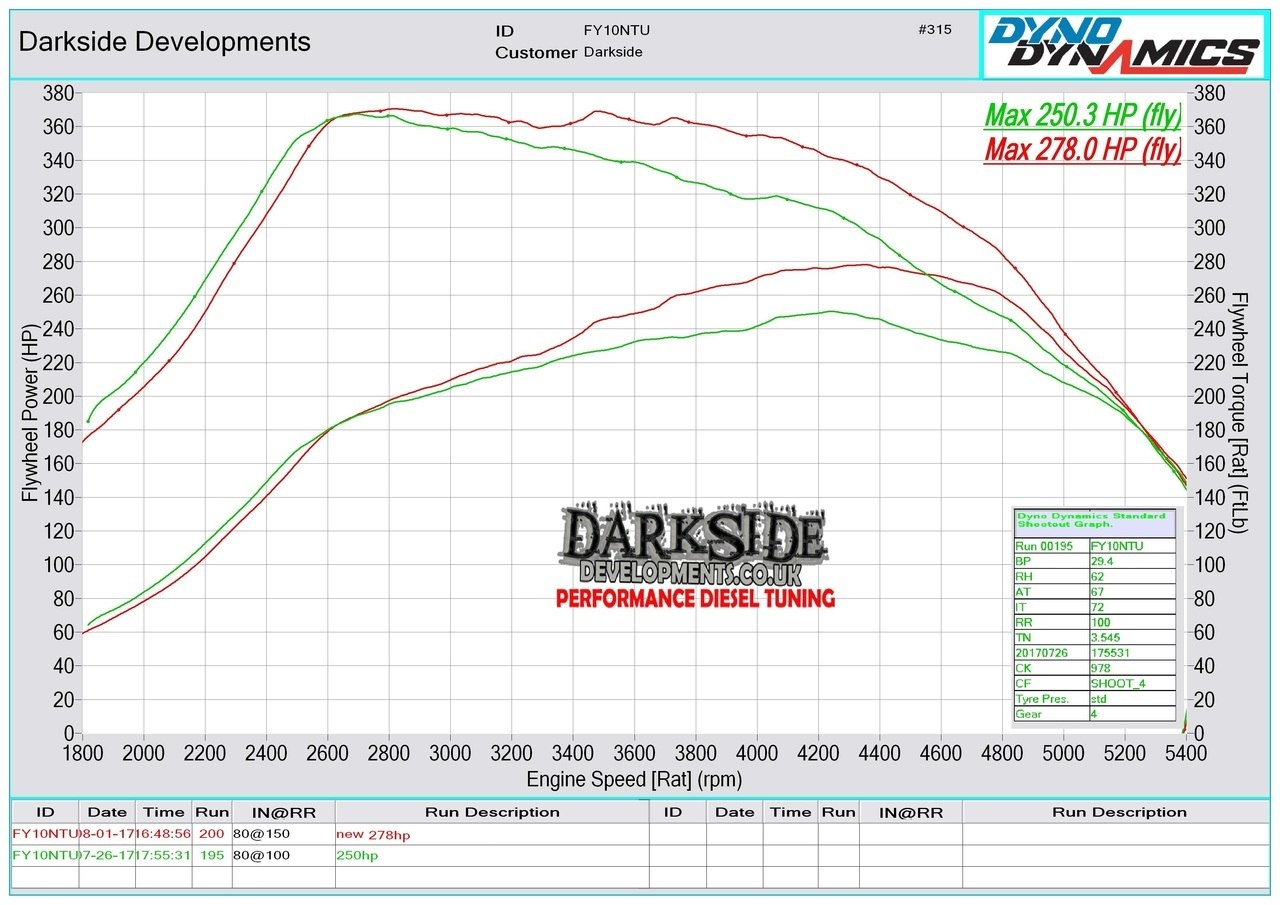
The graph you can see below is from our project Ibiza, No modifications were made to the tune to see the 28hp and significant torque increase.
With the cams and springs installed we rate the oval engines up to 280hp (10-15bhp less on the earlier round port engines) which is a significant increase for cams alone and well worth the time and money invested but still not where we need to be to compete with the power capabilities of the PD engines...
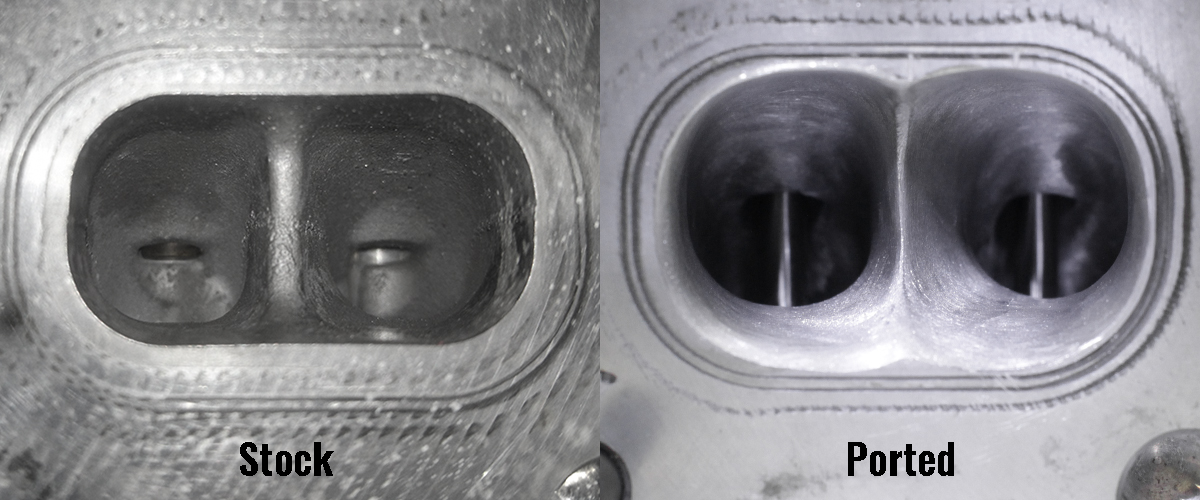
The next step is Head Porting. Just looking inside the ports of a bare CR head you can struggle to fit your little finger in there. Small ports are perfect in the aforementioned low RPM / Light load situation to keep the air velocity high to maintain low emissions and minimal fuel consumption.
As standard the valves are very close to the head gasket fire ring, meaning only a slightly larger valve can be installed without creating costly machine work to create an effective block to head seal.
With a good increase in port size, whilst maintaining the desirable swirl, we are able to open these engines up to achieve over 400hp with sensible levels of smoke and EGTs lower than cars with standard turbos and remap.
We chose to use the Oval Port CR engine from the 2009 to 2014 models for many reasons, but the main one being the larger exhaust ports that allow more power than the earlier Round Port engine. The later Oval Port engines (2014-) are much more complex, the main issue they have is a fixed cam girdle that will not allow the installation of upgraded camshafts.
We also have a few secret modifications we supply only with our ported heads that will help these engines last for a long time at serious power levels.
We have not tested a ported head with stock cams, as cam installation is done at the same time as head installation so we do not see the need in wasting a day or two to do that. Maybe one day if we are bored!
Injectors
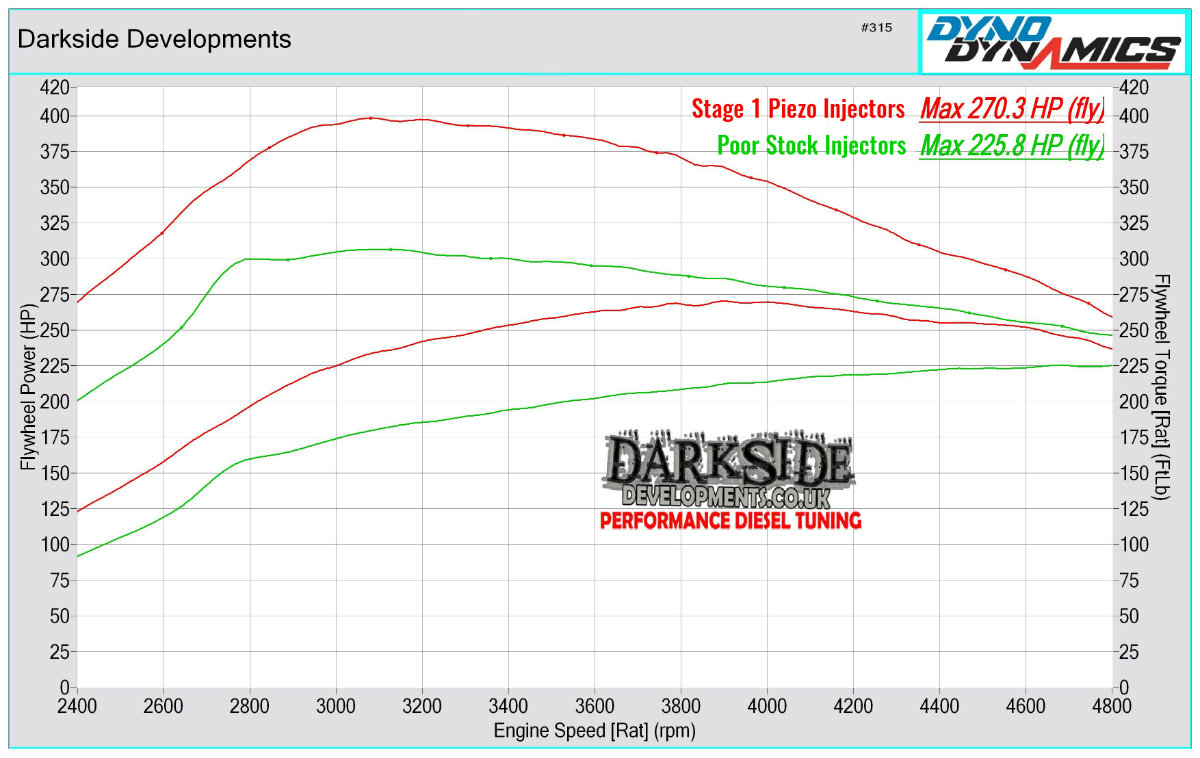
As with any engine, upgraded injectors are one of the best ways to give more power potential, injecting more fuel during the same amount of time is desirable for many reasons. Just remember larger injectors will not be effective without head porting or cams, but can be installed to shorten the injection duration, should you be concerned about the condition of your stock injectors. Generally we are happy to run good condition standard injectors up to 270-280bhp. The Below graph shows a bad set of stock injectors struggling to make the power required, fitting a set of our Stage 1 upgrade immediately brought the power to where we would expect without any extra smoke or exhaust temperature.
Round Port - GTB2260VK, CP3, Performance Camshaft, Stock Head (Poor Stock vs Stage 1 Injectors)
Common Rail engines run a constant fuel pressure, so a small increase in nozzle flow has a dramatic effect upon fuel delivery in comparison to PD injectors. For example, a 160% PD nozzle capable of running 500hp in a 1.9 8v Engine has twice the flow rate of the Common Rail nozzle in the Arosa with 500+hp.
Another upgrade that we make is swapping out earlier injectors to later models that are designed to run at increased rail pressures, all our upgrades are based upon the latest tried and tested components, newer is not always better so care needs to be taken when choosing injectors. Increasing the system pressure allows more fuel to be injected for the same opening time with better atomisation. Running too high pressure on an injector not capable of managing that pressure will damage the injector internals, basically resulting in fuel entering the engine like a hosepipe, with no control and disastrous consequences. We find 2200 BAR to be safe to run for extended periods on our upgraded sets.
So with stronger injector bodies and larger nozzles, fed by a pump more than capable of keeping up with demand the tuning can begin! We try to size our injectors correctly so that the injection window will not be so short that there is very little energy in the exhaust system, meaning a larger turbocharger will struggle to spool. We also have to ensure the injection window is not too long, which can result in excessive EGTs due to the burn happening too late. This also can cause the lip of the piston bowl to melt due to the injector spray reaching the thin edge of the rim. It does not take a rocket scientist to work out that a molten piston has no positive features!
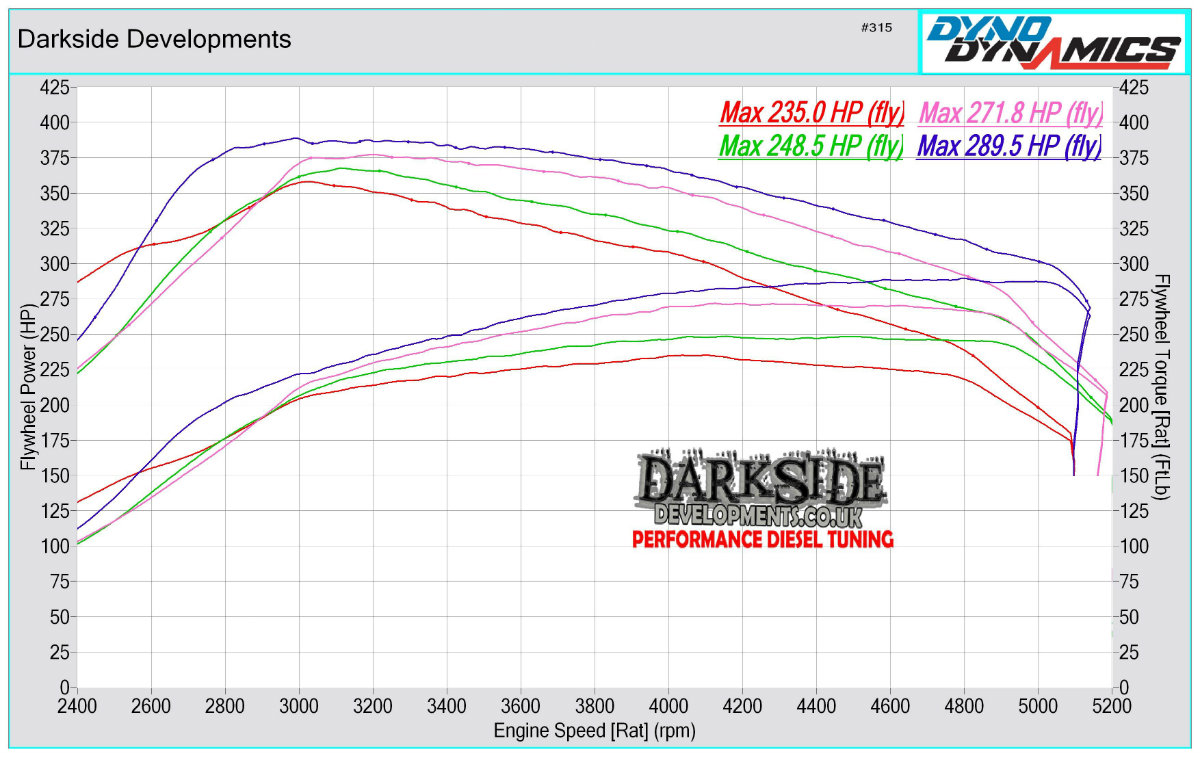
Here is a graph showing the main stages of modifications discussed earlier in this blog. All of the below figures are using our GTB2260VK Turbo Kit, FMIC and Exhaust plus the following:
Red - Stock Injectors, Stock Pump, Stock Head, Stock Cams
Green - Stock Injectors, CP3 Pump, Stock Head, Stock Cams
Pink - Stock Injectors, CP3 Pump, Stock Head, Race Cams
Purple - Stage 1 Injectors, CP3 Pump, Stock Head, Race Cams
A point to note - A standard CP4 Fuel Pump will not work well with Upgraded Injectors, this would result in more limp mode issues due to faster rail drain, so we advise against this.
All the above is considering the correct supporting mods applicable to any engine are already in hand, these are discussed in our other blogs.
Recently we tested our Arosa in ‘Top Speed’ specification using a turbo from a John Deere combine harvester without any Nitrous running on pump diesel we managed to make 460bhp. We are aiming to break our 165mph 1/2mile record soon! This is certainly the most powerful Common Rail 2.0 TDi in the world but we are not done yet

Hopefully this blog has helped you to understand the nature of tuning a Common Rail Engine and how this might differ from previous generations.
Recent Posts
-

What is DRVN?
Not Our First Rodeo DRVN might look like the new name on the scene but behind the brand is serious e …20 05 2026 -

Turbocharger Installation Tips
Fitting a new turbocharger may sound simple but it is easy to miss key steps that could result in an …21 04 2026 -

Let’s talk about VW’s 6 Speed Manual Gearboxes
Many of us discuss what a true ‘drivers’ car should be, most say that 3 pedals and driver input via …26 01 2026