
 - Checklist: What to Do After a Pump Failure")
Failed High-Pressure Fuel Pump (HPFP) - Checklist: What to Do After a Pump Failure
We commonly see failed High-Pressure Fuel Pump (HPFP) on modern Common Rail Diesel Engines resulting in a tangled web of issues, expensive repairs and headaches. The most common symptons are poor startup or a lack of power (especially under hard acceleration).
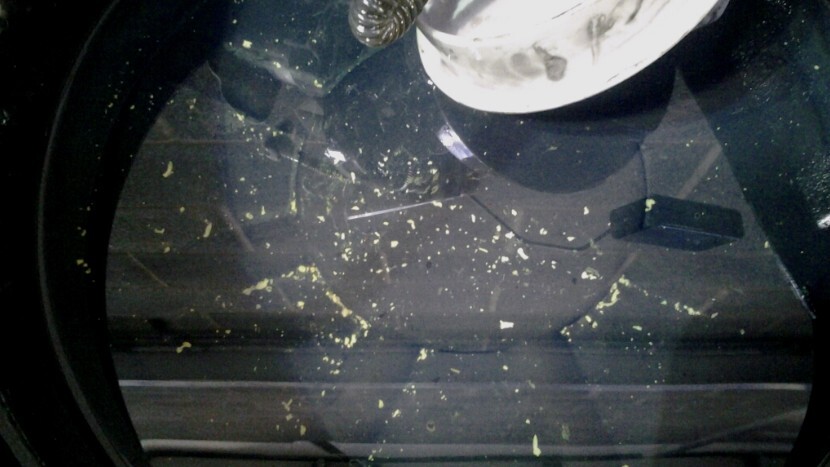
99% of the time HPFP failure is most likely due to internal wear or metal-on-metal contact which often sends metal particles/shavings, also known as "swarf" throughout the entire fuel system. If these contaminants are not removed completely, they can cause repeat failures, damage new components, and lead to expensive repairs.
Below is our comprehensive checklist and recommendations to follow after a HPFP failure. These procedures will help minimise the chance of a second failure and ensure your fuel system is restored to a clean, safe and reliable condition.
1. Drain and Remove the Fuel Tank
When a HPFP fails, debris travels through the return (leak-off) system returning to the source; the fuel tank.
What to do:
Completely drain the fuel tank.
Remove the tank from the vehicle for proper cleaning.
Flush the tank with a suitable cleaning solvent such as parts cleaner and blow it out with compressed air.
In severe cases where debris is excessive or the tank cannot be fully cleaned, we may advise that the tank is replaced.
2. Flush All Fuel Lines
Metal particles (swarf) can become lodged inside the high pressure, low pressure and return fuel lines, we would recommend thoroughly cleaning the lines with solvent and compressed air. Metal debris found in soft rubber hoses can often be trapped or absorbed therefore cannot be cleaned, it is strongly advised to replace these lines rather than reuse.
What to do:
Perform a complete solvent flush of every line.
Use compressed air to clear residual particles.
Replace any rubber or soft fuel hoses, as debris can become embedded in the material and re-circulate later.
3. Clean the Fuel Filter Housing
The fuel filter housing will almost always contain contamination after a pump failure.
What to do:
Remove the fuel filter housing for a full inspection and thorough clean.
Install a brand new fuel filter.
Inspect Seals and O-Rings, these are commonly supplied with a new filter.
4. Replace the HPFP and Metering Valve
Once HPFP failure has been diagnosed, it is a MUST that the old pump and metering valve are replaced, in some cases it may be possible to refurbish and rebuild the pump however for peace of mind a new pump is the way to go. With most new pump a metering valve is supplied.
What to do:
Remove the damaged HPFP.
Install a new, used tested or factory remanufactured pump.
Replace the metering valve (also called the MPROP or pressure control valve), as it can trap debris.
Ensure all mounting surfaces are clean and all the relevant seals are fitted correctly.
5. Clean the Fuel Rail
The fuel rail acts as a redistribution point for high pressure fuel, which means it often collects debris.
What to do:
Remove and thoroughly clean the rail using solvent and compressed air.
Replace both the pressure sensor and pressure regulator, as these components can be compromised by even the smallest metal particles.
6. Test the Injectors
As soon as debris from an HPFP enters the system, it passes directly through the injectors, often causing damage.
What to do:
Send the injectors out for professional bench testing.
We offer an injector testing service which can be found listed HERE.
If they fail to meet the correct test specifications, replace or repair (if possible).
Running damaged injectors can cause misfires, poor performance, or engine damage.
7. Inspect or Replace the In-Tank Lift Pump
The lift pump inside the fuel tank can collect debris on the pickup screen or inside the housing.
What to do:
Remove the lift pump for inspection.
Check for metal shavings or contamination.
Replace the pump if any debris is found or if performance is questionable, this will ensure proper operation and prevent recontamination.
8. Prime the Fuel System Before Restarting
Once all systems are cleaned, it is essential to prime the system which pushes clean fuel through the system and removes trapped air.
Recommended method:
Use diagnostic software such as VAG-COM/VCDS to cycle the in-tank lift pump.
Inspect for leaks and confirm the system is holding pressure before cranking the engine.
9. Data Log After Startup
Once the engine is running again, diagnostics are essential.
Parameters to Monitor:
Fuel rail pressure stability.
Injector balance and correction values.
Any stored or newly triggered Diagnostic Trouble Codes (DTCs).
Signs of rough idle, misfires, or hesitation.
This solidifies that the cleaning process was successful and the fuel system is behaving correctly.
10. Replace the Fuel Filter After 500 Miles
Even with thorough cleaning, some residual debris may remain.
What to do:
Replace the fuel filter again after approximately 500 miles / 805 Kilometres.
For extra protection, consider installing an inline pre-filter either temporarily or permanently to catch any remaining micro-particles.
Final Thoughts
To sum up, recovering from a HPFP failure requires more than just replacing the pump. Our systematic, thorough cleaning procedure is the only way to ensure the new components are protected from contamination. Following this checklist drastically reduces the likelihood of a repeat failure and helps maintain long-term engine reliability.
If you need replacement pumps, injectors, fuel system components, or specialist advice, please contact us.
Recent Posts
-

Let’s talk about VW’s 6 Speed Manual Gearboxes
Many of us discuss what a true ‘drivers’ car should be, most say that 3 pedals and driver input via …26 01 2026 -

Porsche Cayenne 957 Overland Buyers Guide
The Most Luxurious Off-Road Vehicle? Lately, the Porsche Cayenne 955/957 has been gaini …21 01 2026 -

Donington GP - Roadsports & ClubEnduro - 750MC - 10th - 12th October 2025
Round 5 of the 750MC RoadSports Championship was way back in August at Silverstone. That was a disa …09 01 2026